What are Receipts?
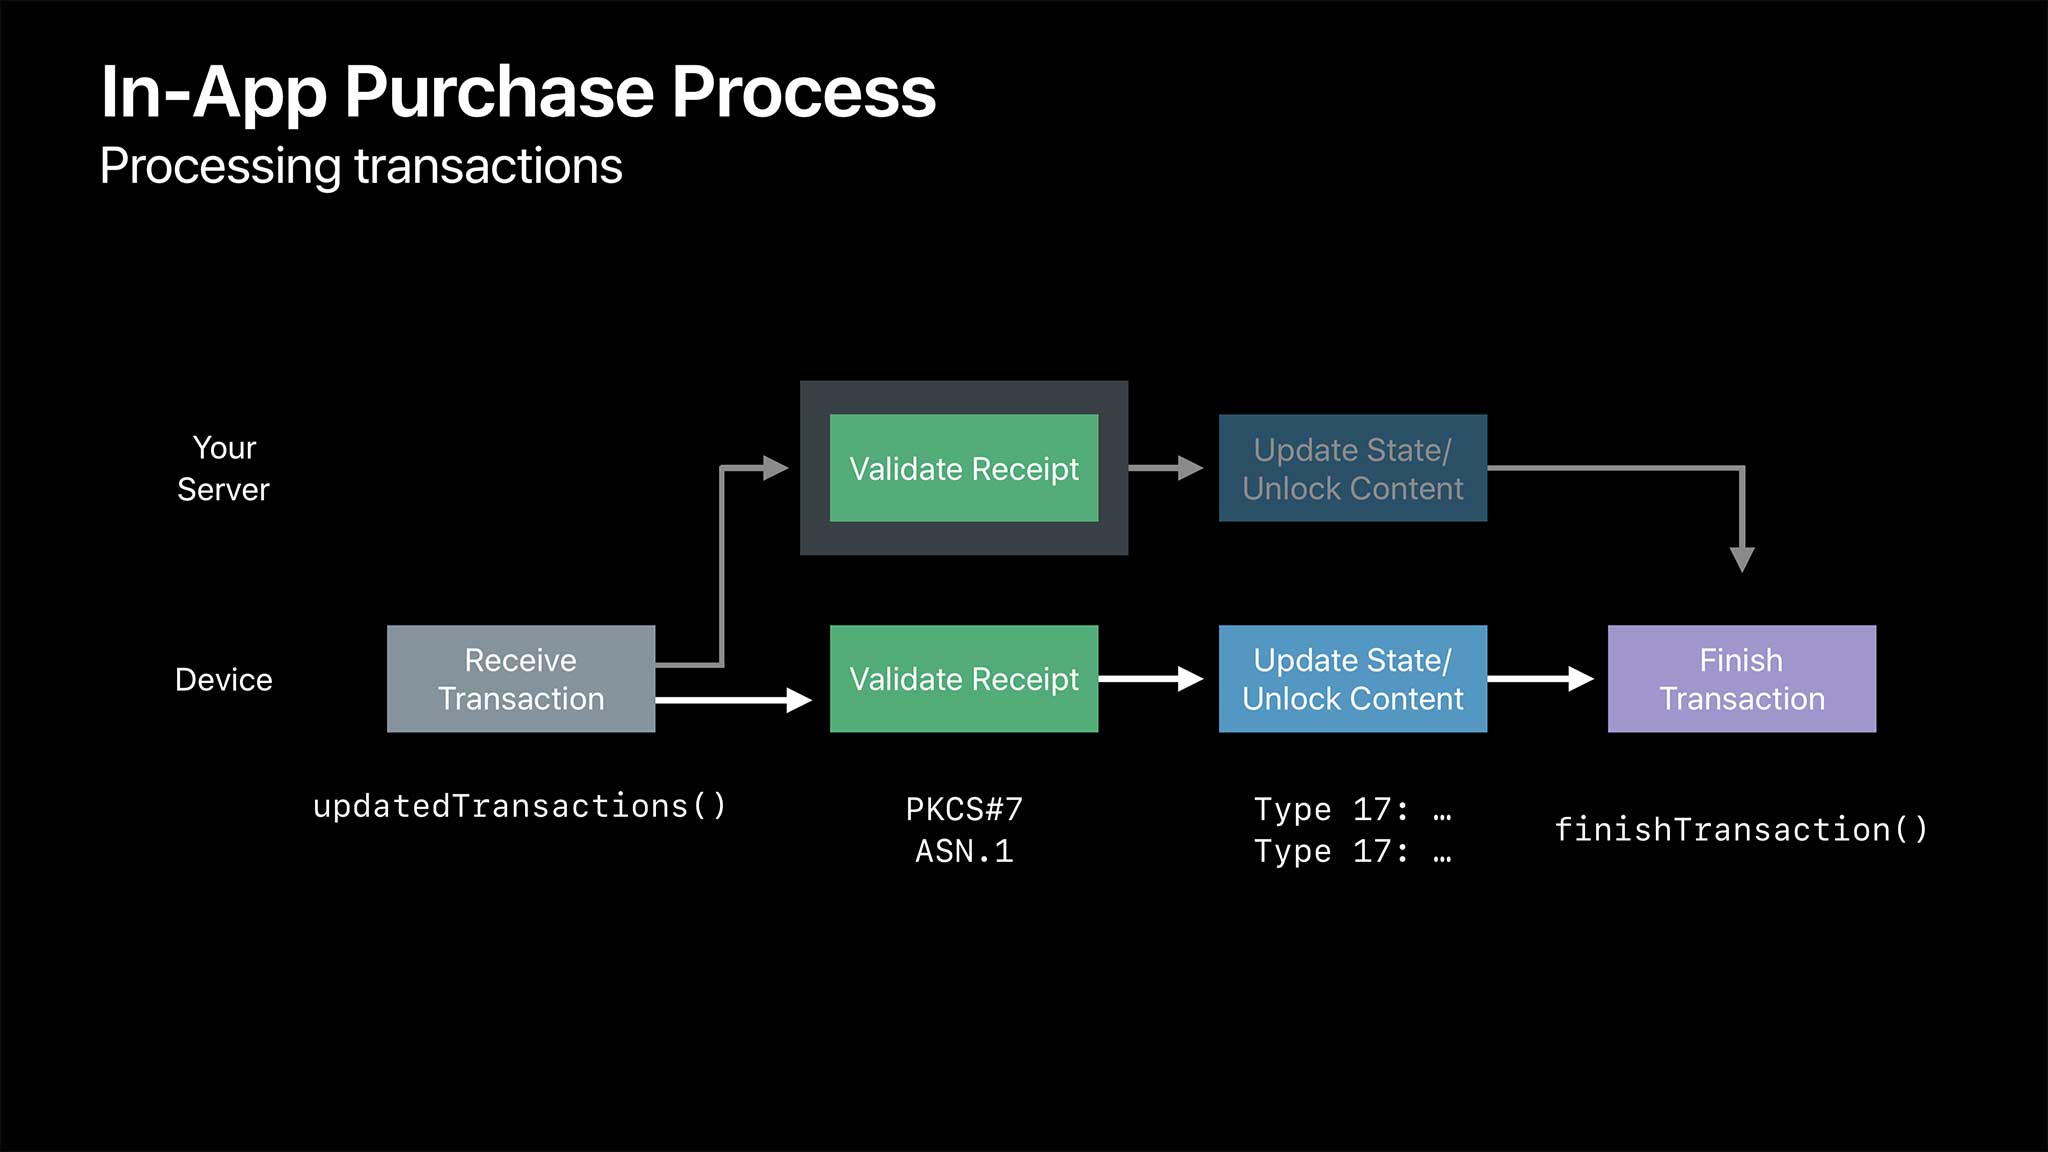
Each app on iOS stores data about its in-app purchases (record of sale). This record of sale is called receipt . You can validate the receipt in two ways: 1) locally on your iOS device or 2) on your own server by validating the receipt directly with Apple's App Store.
This blog post will cover the second option and I will describe how you can send the receipt from your iOS device to your own server and how the server can validate the receipt with the App Store.
"The city’s central computer told you? R2D2, you know better than to trust a strange computer!"
I will not delve into all the security related topics that are part of in-app purchases and receipt validation. Neither will I touch the topic subscriptions. I will rather show a short example on how you can implement receipt validation on iOS with Swift on client side and Go on the server side. We will start at the point where the user already triggered a purchase via StoreKit but before the transaction was finished on client side.
There are several reasons why you might want to use your own server to validate the in-app purchases done by your users. One reason might be that you do not want to implement a rather complex verification locally on your device. Another reason might be that an in-app purchase unlocks content/features on your server for your users. Or maybe you just want to know how it works ;-)
Retrieving Receipt on client
Once the user initiated a purchase on the device you will receive a call to func paymentQueue(SKPaymentQueue, updatedTransactions: [SKPaymentTransaction]) via the SKPaymentTransactionObserver protocol. When the SKPaymentTransaction is flagged as purchased, and before you call SKPaymentQueue.default().finishTransaction(transaction), that's the right time to validate the receipt. First we need to access our app's receipt so that we can then send it to our server
Prepare HTTP Request
With the receipt data available we can now prepare the HTTP request to our server backend. One interesting detail here is that you can determine your app's environment (Production or Sandbox) by checking the suffix of your receipts URL. When the URL ends with 'sandboxReceipt' your app is running in Sandbox environment.
Encode Payload data
Apple expects the receipt in base64 format. So the first thing we need to do is to convert the
receipt data by calling receiptData.base64EncodedString(). As we want to send the receipt in
json format to our server we make use of the Codable protocol and convert the
ReceiptData struct to json by calling JSONEncoder().encode(receiptRequestData).
Now we can start the HTTP POST request together with the json body and send the request via task.resume().
Error handling
In the completion handler of uploadTask we do some basic error handling like checking the error result of the request and also checking the server response code (which we expect to be 200 - OK). We now can decode the response data returned by our server. Here we also make use of the Codable protocol and decode the json data to a value of type AppStoreValidationResult. The data structure of AppStoreValidationResult is the format we use on our server (which we will see in the server implementation later) as the response we send back to the initial client request. When the status (AppStoreValidationResult.status) we receive is zero, everything went fine and the receipt is valid.
Go server implementation
Go is an open source project developed by Google and others. Go is meant to be expressive, concise, clean, and efficient. It has great support for multicore programming, compiles to native machine code and comes with an efficient garbage collector. Further there are a lot of packages available that extend Go's functionality and make it easy to create a simple REST server.
First we declare several structs (ReceiptData, AppStoreReceiptData and ReceiptValidationResult) that we use to encode/decode to/from json. By using the 'github.com/gorilla/mux' package we include support for a URL router to handle requests to our endpoint (/validatereceipt). We create an instance of this router via router := mux.NewRouter() and start a HTTP server with this new router by calling http.ListenAndServe("localhost:8080", router).
Router endpoints
A router can handle multiple routes/endpoints. Each endpoint has a corresponding method that gets triggered when a request is received. This method has two parameters. The http.ResponseWriter parameter is used to write a response and the http.Request parameter is the actual request received by our server.
Decode json request body
The request body the client sends contains the receipt in base64 format and a flag in which environment the app operates. First we create a json decoder by passing the json body decoder := json.NewDecoder(r.Body) and then we decode the json data to the previously declared struct type ReceiptData via error := decoder.Decode(&receipt). In case this results in an error we stop processing the request and return immediately with error http.StatusBadRequest.
Which App Store URL?
Apple offers two distinct URL's for receipt validation. Depending on the environment (Production or Sandbox) we have to choose the corresponding URL. If we send our request to the wrong App Store URL we will receive an error. Fortunately the iOS client helps us with this decision by passing a flag in ReceiptData.IsSandBox. Next we create a variable of type AppStoreReceiptData that holds the base64 receipt: appStoreReceiptData := AppStoreReceiptData{ReceiptData:receipt.ReceiptBase64}. This variable is then encoded to json format so that we can use it as payload of our request to Apple's App Store: json.NewEncoder(buffer).Encode(appStoreReceiptData).
Talking to App Store
Finally we are able to create a request to the App Store by calling response, error := http.Post(appStoreURL, "application/json", buffer) with the base64 receipt as payload. Once we received a response from App Store we now can decode its json body to our struct type ReceiptValidationResult, again by creating a variable of the desired struct type var receiptValidationResult ReceiptValidationResult and decoding the json into that format json.NewDecoder(response.Body).Decode(&receiptValidationResult).
Respond to Client
Finally we can send the receipt validation result back to our client. We need to ensure that our
response body has the correct content-type set by writer.Header().Set("Content-Type",
"application/json") and then encode the struct of type ReceiptValidationResult to
json: json.NewEncoder(writer).Encode(receiptValidationResult).
And that is all. Now the response was sent to the client and the client can finish the SKPaymentTransaction
for this purchase.
Thank you for reading this blog post. If you enjoyed it please share my post or connect via Twitter or Instagram. 🤓


